I’ve been trying to make the Azure Stack Proof-of-Concept (Preview 2) run on VMware and here is what I found.
First of all, the documentation to set this stuff up can be found here: Deploy Azure Stack POC
Prepare VM
As I currently run VMware in my lab and didn’t want to re-install the physical server, I tried to get the Azure Stack up and running in a VMware VM. Following the recommendation for sizing, I created a VM with 100GB of RAM, 24 vCPUs, one vNIC and 5 hard disks with 200GB each. The many vCPUs are actually not necessary, as the hardware check does fail even though enough cores should be available. More on that later.
Additionally, I did enable the “Hardware virtualization” feature in the VM’s CPU settings. You can do this using the vSphere Web Client or use the following quick-and-dirty PowerCLI function for it:
As the Virtual Machine will run Hyper-V and some guest VMs, we have to disable the security features on the virtual Port Group where the VM is connected to:
Get-VDSecurityPolicy -VDPortgroup VLAN95 |
Set-VDSecurityPolicy -AllowPromiscuous:$true -MacChanges:$true -ForgedTransmits:$true
Note in the above example I’m using a distributed virtual Port Group. For a standard virtual Port Group use
Set-SecurityPolicy.
Prepare Windows
The next step is to install Windows and the VMware tools, download the Azure Stack TP2 support files (see documentation link above) and copy the CloudBuilder.vhdx file to the root of the C drive of our VM. Then I started .\PrepareBootFromVHD.ps1 -CloudBuilderDiskPath and was confronted with an error, stating “The server is currently already booted from a virtual hard disk…”
Fortunatelly, the fix is easy: Open the PrepareBootFromVHD.ps1 file and find the following section:
if ((get-disk | where {$_.isboot -eq $true}).Model -match 'Virtual Disk')
    {
    Write-Host "The server is currently already booted from a virtual hard disk, to boot the server from the CloudBuilder.vhdx you will need to run this script on an Operating System that is installed on the physical disk of this server."
    Exit
    }
Now either remove the section or just remove the Exit. That way, it will still display a warning but no longer stop the execution of the script.
Again, start .\PrepareBootFromVHD.ps1 -CloudBuilderDiskPath which should now succeed and prompt for a reboot of the machine.
Install the Cloud
The VM restarts and boots from the CloudBuilder.vhdx file with the typical OOBE asking for an admin password and the product key. Once set, startup continues and we can log-in to the VM. At this point, we’ll have to install the VMware tools again.
The next step is to initialize the additional hard disks for the machine. The disks must be “empty” so do not create any volumes. I just run Get-Disk | Initialize-Disk and move on.
Now the documentation wants us to open an administrative PowerShell console, change into the C:\CloudDeployment\Configuration folder and run the installation script. As a few checks are built-in to prevent this kind of setup (and verify hardware resources) this will fail with the following error message:
2016-10-13 08:03:58 Error    Task: Invocation of interface 'Validate' of role 'Cloud\Infrastructure\BareMetal' failed:

Function 'Test-BareMetalRole' in module 'Roles\PhysicalMachines\PhysicalMachines.psd1' raised an exception:

One or more validation test failed for Role 'BareMetal' on machine 'WIN-MUTSIQJMO43'
For detailed test results look at file '\\WIN-MUTSIQJMO43\C$\CloudDeployment\Logs\Tests\TestResults_WIN-MUTSIQJMO43_BareMetal_2016-10-13-08-03-44.xml'
Test Failed: Validate that the computer 'WIN-MUTSIQJMO43' is a physical machine.
Test Failed: Validate that at least 12 cores are available in computer WIN-MUTSIQJMO43.
At C:\CloudDeployment\Roles\Common\RoleHelpers.psm1:875.
+         Trace-Error $message
at Trace-Error, C:\CloudDeployment\Common\Tracer.psm1: line 52
at Start-Test, C:\CloudDeployment\Roles\Common\RoleHelpers.psm1: line 875
at Test-BareMetalRole, C:\CloudDeployment\Roles\PhysicalMachines\TestPhysicalMachines.psm1: line 86
at <ScriptBlock>, <No file>: line 18
2016-10-13 08:03:58 Verbose  Step: Status of step '(DEP) Validate Physical Machines' is 'Error'.
So the two tests that failed use the following CIM Instances (WMI) to query information about the host system: Win32_ComputerSystem, Win32_Processor Now even though I did configure 24 vCPUs for my VM, the NumberOfEnabledCore attribute of Win32_Processor shows a value of “0”.
Here too, there’s an easy fix: Find the BareMetal.Tests.ps1 file in the C:\CloudDeployment\Roles\PhysicalMachines\Tests directory and make the following tests pass:
# Validate this is not a virtual machine.
foreach ($physicalMachine in $physicalMachines)
{
    It ($BareMetalLocalizedStrings.TestNotVirtualMachine -f @($physicalMachine.ComputerName)) `
    {
        $physicalMachine.IsVirtualMachine | Should Be $false
    }
}
...
# Validate the number of cores on each of the machines meets the required minimum.
foreach ($physicalMachine in $physicalMachines)
{
    It ($BareMetalLocalizedStrings.TestMinimumNumberOfCores -f @($minimumNumberOfCoresPerMachine.ToString(), $physicalMachine.ComputerName)) `
    {
        ($physicalMachine.Processors.NumberOfEnabledCores | Measure-Object -Sum).Sum | Should Not BeLessThan $minimumNumberOfCoresPerMachine
    }
}
Again, we could just remove the actual test (the expression inside the It {} statement) or make it a comment or modify the code to make it pass. I ended up with the following, slight modification:
# Validate this is not a virtual machine.
foreach ($physicalMachine in $physicalMachines)
{
    It ($BareMetalLocalizedStrings.TestNotVirtualMachine -f @($physicalMachine.ComputerName)) `
    {
        #$physicalMachine.IsVirtualMachine | Should Be $false
    }
}
...
# Validate the number of cores on each of the machines meets the required minimum.
foreach ($physicalMachine in $physicalMachines)
{
    It ($BareMetalLocalizedStrings.TestMinimumNumberOfCores -f @($minimumNumberOfCoresPerMachine.ToString(), $physicalMachine.ComputerName)) `
    {
        #($physicalMachine.Processors.NumberOfEnabledCores | Measure-Object -Sum).Sum | Should Not BeLessThan $minimumNumberOfCoresPerMachine
    }
}
By the way, you’ll see that this script is signed, so in order to make it run, remove the signature and save the script.
Install the Cloud #2
Now we can go ahead and invoke the install script to actually install Azure Stack inside the virtual machine. As there is no DHCP Server available in the network into which I’m deploying, I specify a few options when invoking the installation script:
$installParams = @{
    NatIPv4Subnet = "172.16.8.0/24";
    NatIPv4Address = "172.16.8.212";
    NatIPv4DefaultGateway = "172.16.8.254";
    EnvironmentDNS = "172.16.8.120";
}
.\InstallAzureStackPOC.ps1 @installParams
Note that this script has a rerun parameter, so if execution failes, it can be invoked again and will continue where it left off:
.\InstallAzureStackPOC.ps1 -RerunNote that at some point of the installation, the VM is rebooted and logged in automatically to the account “azurestack\azurestackadmin”. From that moment on, all installation related tasks (such as a -Rerun) should be performed using this account.
I did stumble over another prolem, installation stopped with the following error:
2016-10-13 13:48:18 Error    Task: Invocation of interface 'Configure' of role 'Cloud\Fabric\NC' failed:

Function 'ConfigureNC' in module 'Roles\NC\NC.psd1' raised an exception:

Task failed with the following error: 'The WinRM client sent a request to the remote WS-Management service and was notified that the request size exceeded the configured MaxEnvelopeSize quota.'.
At C:\CloudDeployment\Roles\Common\RoleHelpers.psm1:83.
+         $status.ErrorMessage
at Trace-Error, C:\CloudDeployment\Common\Tracer.psm1: line 52
at Start-PSScriptUsingTask, C:\CloudDeployment\Roles\Common\RoleHelpers.psm1: line 83
at ConfigureNC, C:\CloudDeployment\Roles\NC\NC.psm1: line 620
at <ScriptBlock>, <No file>: line 18
2016-10-13 13:48:18 Verbose  Step: Status of step '(NET) Configure NC on VMs' is 'Error'.
Apparently the default value of 500 for MaxEnvelopeSize is not enough, I used the following command to increase the size to 8192:
winrm set winrm/config '@{MaxEnvelopeSizekb="8192"}'
Result
Once the InstallAzureStackPOC.ps1 script finished running, there will be 13 VMs running on our “Host VM”, consuming about 52GB of RAM:
Get-VM

Name         State   CPUUsage(%) MemoryAssigned(M) Uptime           Status             Version
----         -----   ----------- ----------------- ------           ------             -------
MAS-ACS01    Running 0           8192              00:46:18.2560000 Operating normally 8.0
MAS-ADFS01   Running 0           1164              01:33:39.1820000 Operating normally 8.0
MAS-ASql01   Running 0           4096              01:00:02.6710000 Operating normally 8.0
MAS-BGPNAT01 Running 0           1460              01:46:26.7640000 Operating normally 8.0
MAS-CA01     Running 0           844               01:32:56.9940000 Operating normally 8.0
MAS-Con01    Running 0           4096              01:39:16.7620000 Operating normally 8.0
MAS-DC01     Running 0           4096              02:09:00.7000000 Operating normally 8.0
MAS-Gwy01    Running 0           4096              00:54:18.0770000 Operating normally 8.0
MAS-NC01     Running 0           2048              01:19:39.9240000 Operating normally 8.0
MAS-SLB01    Running 0           4096              01:04:11.8220000 Operating normally 8.0
MAS-SUS01    Running 0           2048              01:37:49.5430000 Operating normally 8.0
MAS-WAS01    Running 1           8192              01:36:31.2300000 Operating normally 8.0
MAS-Xrp01    Running 0           8192              01:34:04.3710000 Operating normally 8.0
If you encounter problems during installation, make sure to check the summary.log.xml file in C:\CloudDeployment\Logs.
To actually log in to the Azure Stack Portal, open the MAS-Con01 VM’s conole and find a link to the portal on the desktop:
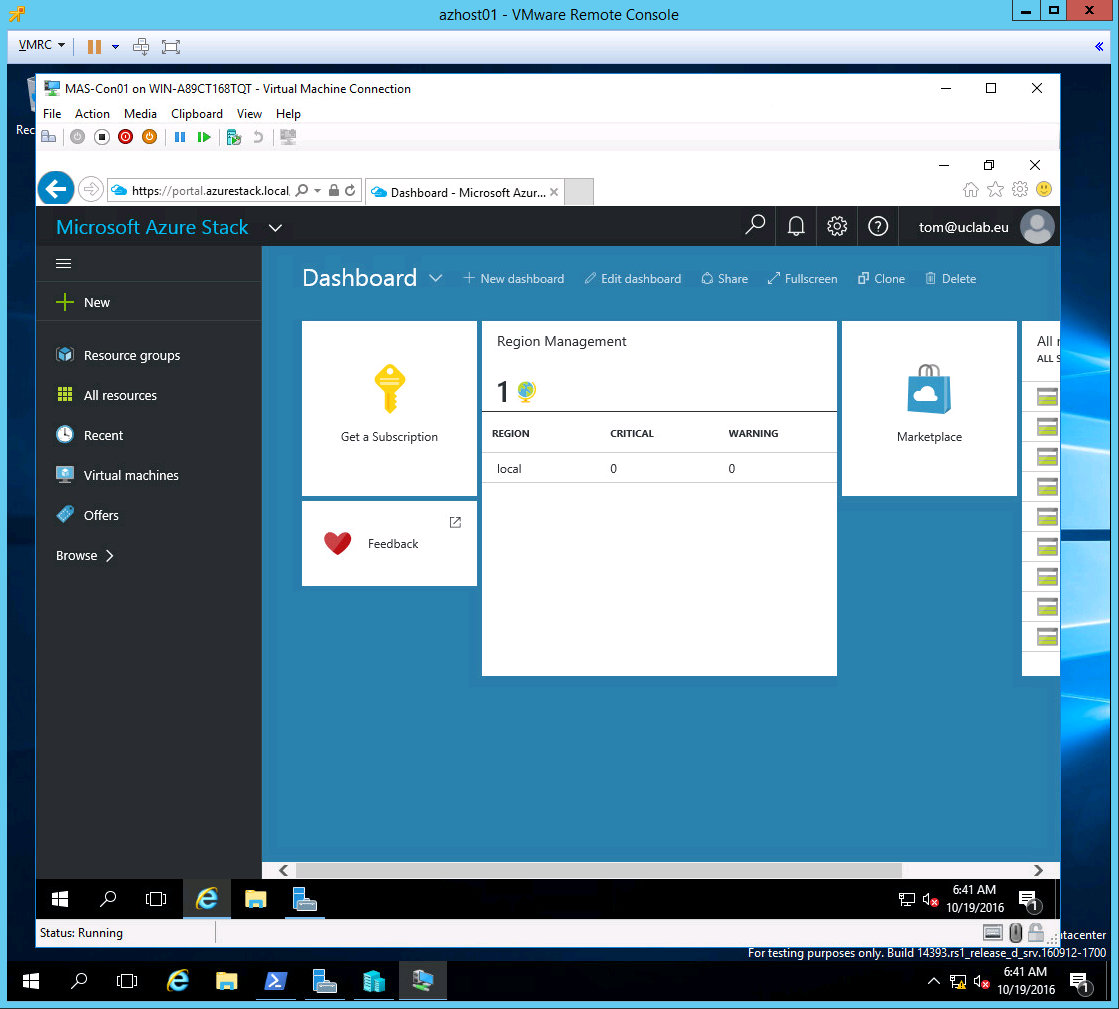
Ok, so with that: Have fun with Azure Stack and happy hacking ;)
Tom